Deploying a Single-Page App with S3 and Cloudfront
One of my hopes for this blog is to share what I’ve learned with the world, so that developers from all over can come together and learn from my wisdom.
Ok, ok…really it’s just to document stuff so I can remember how the heck I did something difficult if I ever need to do it again. I can’t count how many times I’ve had to piece together information from six different blog posts and documentation sites to get a clear picture of the one workflow I’m trying to figure out. Once I do understand the full picture, I often wish there had been an explanation written in the way I would have explained it, so this blog is me deciding to write some of those explanations.
I figured I’d start with something I just did recently, which is…deploying a React application to Amazon S3 and setting up a CloudFront distribution for it! Yay! The one thing you’ve always wished you knew how to do!

If the premise of hosting a static site in S3/CloudFront already makes sense to you, feel free to skip ahead. But if you’d like a little background, keep reading!
A little background
But Andrew, S3 is just file storage. How can I host an interactive website there?
I’m glad you asked. The way traditional websites display content on the page is approximately this:
- You visit
hackinginprogress.andrewweinstein.devin your browser. - The browser makes a request to that URL, which maps (more on DNS records another time!) to a server that I own.
- My code, which is running on that server, processes your request and generates an HTML page, which it returns in a response to the browser.
- The browser renders that HTML page on your screen.
- You click a link on the page, which takes you to a different page, where the same process is repeated.
Modern JavaScript-based single-page applications (React, Angular, etc.) are a bit different. While there might still be API calls to a server to fetch data, the process of rendering HTML to display on the screen is not handled by code running on a server somewhere, but rather by JavaScript code running in the browser itself. You could still run a server and set up your application like this:
- You visit
hackinginprogress.andrewweinstein.devin your browser. - The browser makes a request to that URL, which maps to a server that I own.
- My code, which is running on that server, processes your request and returns a bundle of static assets, including a skeleton of an HTML page and a bunch of JavaScript (and probably some CSS).
- The browser renders the HTML skeleton and then executes the JavaScript, which fills out the page and makes it interactive.
However, this now feels a little heavy-handed, because the only thing the server is doing is returning static content. Why can’t we just store that content in a place designed for that purpose, like…S3?
- You visit
hackinginprogress.andrewweinstein.devin your browser. - The browser makes a request to that URL, which maps to an S3 bucket containing all the HTML, JS, and CSS for my website.
- The browser renders the HTML skeleton and then executes the JavaScript, which fills out the page and makes it interactive.
Look, mom! No server!
So how does CloudFront fit in?
The thing about static assets is that they’re…well…static. They don’t change from one request to the next (unless I update my website).

Weird, right? Anyway, if you know something isn’t going to change, there’s no point fetching it all the way from the server on every request. You can just tell the browser to cache it. But you can go a step further than that using a thing called a content delivery network (CDN). This is basically just a network of servers distributed across a region, or the country, or the world, or whatever, so that the servers are never too far away from the clients requesting data from them. Let’s pretend my S3 bucket is in Amazon’s Virginia region. If you’re in California, it’s going to take a while for your request to get to Virginia and for the data to come all the way back. So basically what I’ll do is set up another copy of the bucket in California, have it periodically sync its data from the Virginia bucket, and then direct your request to the California bucket by detecting your location.
Instead of me setting up a copy of the bucket, though, what I’ll actually do is use Amazon’s CDN, which is called CloudFront. I can set up a CloudFront distribution in front of my S3 bucket so that it caches content at a whole bunch of edge locations around the world. The first time a user in California requests data from my Virginia bucket, their request will go all the way to Virginia, but then the response will be cached at the edge location closest to that user. The next time someone else in California requests the same content, it will just be served from the CA edge location.
Instructions
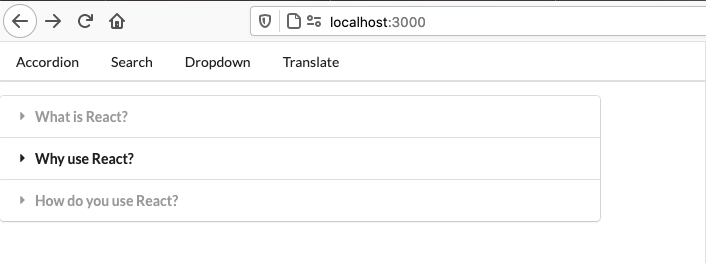
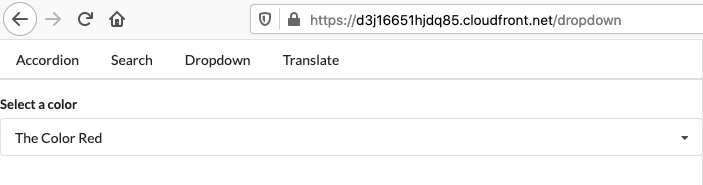
Step one: have a React application
Suffice to say that instructions for this are beyond the scope of this post. As a demo, I’ll be using a little app I build a while ago as part of Stephen Grider’s excellent React + Redux course on Udemy. The home page looks like this:
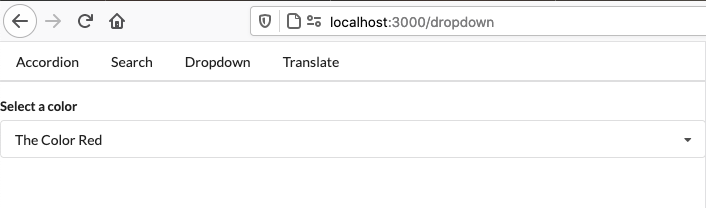
And there’s a page at /dropdown that looks like this:
I’ll build my app by running yarn build, which just runs react-scripts build to generate an optimized production build, which I’ll upload to S3 in the next step.
Step two: set up an S3 bucket
This is, on the face of it, very easy. You just go into S3, enter a bucket name, and pick a region.
If you were hosting your site purely in S3, you would need to allow public access to the bucket. But since we’ll be using CloudFront to serve content, we do NOT need to do this, so leave the “block all public access” option selected.
Once you have created your bucket, simply upload the contents of the build directory that were generated when you build your React app in the previous step.
Step three: set up a CloudFront distribution
Go into CloudFront and create a new distribution. There are lot of options you can ignore and some you can’t. I’ll only mention the things you need to fill out:
- Click into the “Origin Domain Name” box. You’ll see a list of available S3 buckets to choose from as content origins. They should look like
bucket-name.s3.amazonaws.com. Choose the bucket where you uploaded your built React app. - Change “Restrict Bucket Access” to Yes. More on this shortly.
- For “Origin Access Identity,” choose “Create a New Identity.
- For “Grant Read Permissions on Bucket,” choose “Yes, Update Bucket Policy.”
- If you have a custom domain with an SSL certificate, change “Viewer Protocol Policy” to “Redirect HTTP to HTTPS.”
- For “Price Class,” set as desired. Note that the default is worldwide, which is the most expensive option. You can select a smaller region to keep costs down. US, Canada, and Europe is the cheapest.
- If you have a custom domain, enter it in the “Alternate Domain Names (CNAMEs)” box.
- If you have an SSL certificate in AWS Certificate Manager for your custom domain, select “Custom SSL Certificate” and choose your cert.
- For “Default Root Object,” enter “index.html”.
- Click “Create Distribution.”
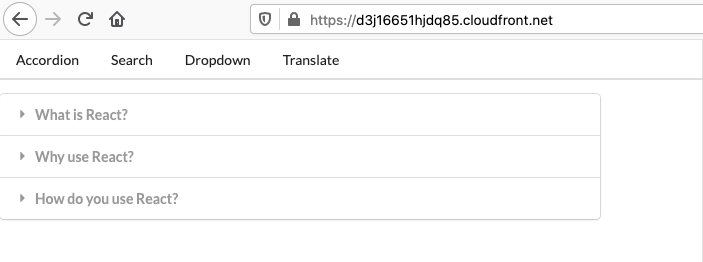
It will take a few minutes for your distribution to deploy, but when it does, you should be able to visit the distribution domain name and see your app:
Wait, what was all that about restricting bucket access?
Right, I said there’d be more on this. With the CloudFront distribution, people aren’t reaching into your bucket and viewing objects directly; they’re accessing a CloudFront URL, and CloudFront retrieves the files from S3 and serves them to the client. This means that your bucket doesn’t need to be public, but it does need to be accessible by the CloudFront distribution. AWS has a mechanism for this called an Origin Access Identity (OAI). It’s basically a special role that has access to the S3 bucket and can be assumed by the CloudFront distribution. The CloudFront setup wizard hides some of these steps from you, but if you go back to your S3 bucket and look at the bucket policy, you should see something like this:
{
    "Version": "2008-10-17",
    "Id": "PolicyForCloudFrontPrivateContent",
    "Statement": [
        {
            "Sid": "1",
            "Effect": "Allow",
            "Principal": {
                "AWS": "arn:aws:iam::cloudfront:user/CloudFront Origin Access Identity <some id>"
            },
            "Action": "s3:GetObject",
            "Resource": "arn:aws:s3:::bucket-name/*"
        }
    ]
}
The value of the AWS principal entry is the id of the OAI that CloudFront created for you. It is granted the IAM s3:GetObject permission on all objects in your bucket so that it can retrieve content without the bucket being publicly accessible. Neat!

Step four: navigation
Remember how my React app had two pages? Let’s try to look at the other one:
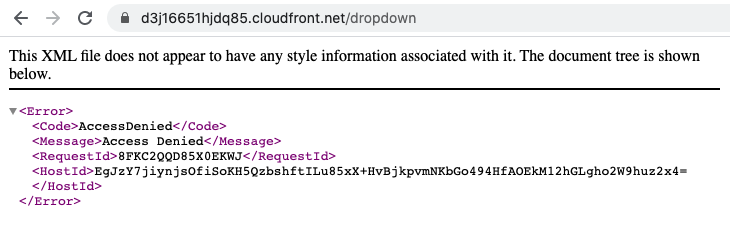
Uh oh. What’s going on?
Well, let’s think about how navigation works in React. Remember that this is a single-page app. There’s only one actual HTML page! There’s just an index.html file with some script tags, and all of the content and interaction is rendered and handled by JavaScript. Let’s say I have a link on my home page to /dropdown, where the link is implemented using the React router. If I click that link, the click is handled by JS, which checks the target and renders the appropriate component. It also updates the browser’s address bar to match, but there’s no actual navigation occurring. The only way the app works at all is that I’ve told CloudFront to serve /index.html as the root object, so when I visit the root path, that’s what I get. When I visit /dropdown directly, it doesn’t know what to do, because there’s no file at /dropdown in the S3 bucket.
How do we fix this? We can create a custom error-handling rule on the CloudFront distribution. Go back to the distribution and find the “Error Pages” tab, and create a custom error response:
- HTTP error code: 404 not found
- Customize error response: yes
- Response page path:
/index.html - HTTP response code: 200 ok
Your distribution will take a few minutes to update. What did we just do? We told CloudFront that, if it receives a 404 response from the origin (the S3 bucket), it should actually just retrieve the index.html page and return that with a 200 response. This works because that page contains all the JS to make our app work, including the React router. When that page renders, the router JS will look at the path, see that it ends with /dropdown, and find the correct component to render.

So let’s try again:
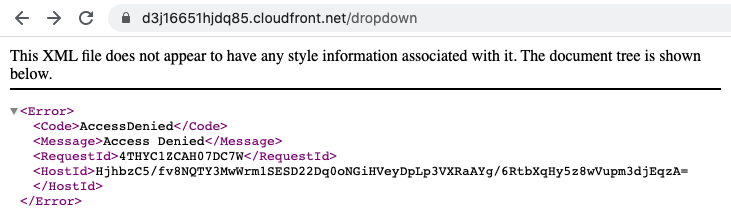
Dang. What did we miss?
If you’re paying close attention, you might have noticed that our error handling rule was for a 404 response, but the error doesn’t say not found; it says access denied. This is because of how S3 works. For security reasons, it’s best not to reveal information about what’s in a bucket. If you request some object by name, you should see the same response whether that object doesn’t exist OR you simply don’t have access to it. Remember that our bucket policy allows the CloudFront OAI to get any given object from the bucket, but it does NOT allow the OAI to list the contents of the bucket. So essentially, the 403 and 404 responses appear the same to the distribution. This is great for security but bad for our app. Fortunately, there’s an easy workaround (h/t this post by Emiliano Gabrielli): since our bucket is already private and can only be accessed by the OAI, it’s safe for us to grant the OAI permissions to list objects in the bucket, so it can tell the difference between a 403 and a 404. We can update the bucket policy so it looks like this:
{
    "Version": "2008-10-17",
    "Id": "PolicyForCloudFrontPrivateContent",
    "Statement": [
        {
            "Sid": "1",
            "Effect": "Allow",
            "Principal": {
                "AWS": "arn:aws:iam::cloudfront:user/CloudFront Origin Access Identity <some id>"
            },
            "Action": "s3:GetObject",
            "Resource": "arn:aws:s3:::bucket-name/*"
        },
        {
            "Sid": "2",
            "Effect": "Allow",
            "Principal": {
                "AWS": "arn:aws:iam::cloudfront:user/CloudFront Origin Access Identity <some id>"
            },
            "Action": "s3:ListBucket",
            "Resource": "arn:aws:s3:::bucket-name"
        }
    ]
}
And let’s try that dropdown page one more time:
Success! Now that CloudFront is allowed to list the bucket contents, S3 can give it a 404 response to its request for /dropdown, and then CloudFront will use our custom 404 error response to return the /index.html object. The React app loads, looks at the path, and correctly renders the dropdown component.
Appendix 1: custom domain
I pointed out a couple of steps above that only apply if you have a custom domain for your distribution. I do, and here’s what that looks like:
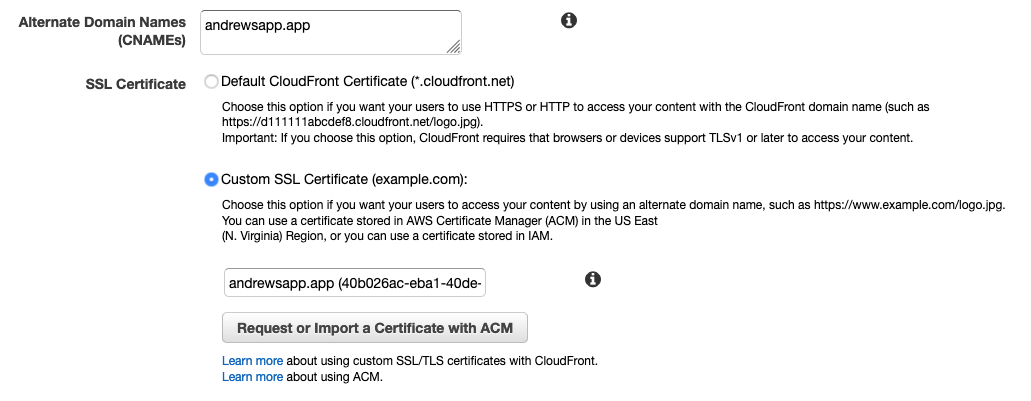
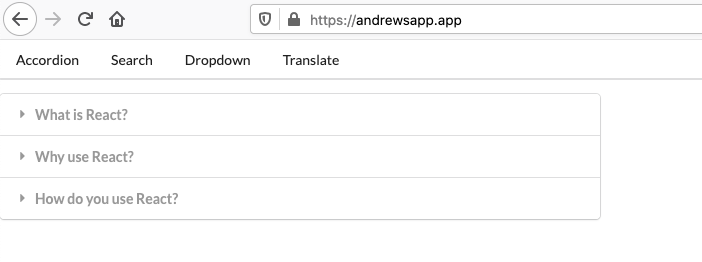
I own andrewsapp.app and have set up an alias record to point it at the domain of my CloudFront distribution. I’ve also provisioned an SSL certificate through AWS Certificate Manager in the us-east-1 region. With this setup, I can visit my custom domain and see the content served from CloudFront:
Appendix 2: Next.js
This one is fun. I won’t go as in depth here, but I wanted to touch on it briefly.
If you’re working with Next.js, you’re most likely using some form of server-side rendering, which will require some sort of Jamstack deployment like Vercel or an actual Node.js server. However, if you don’t have any pages that require request-time SSR, you can export a static build of your app and serve it as a static site.
You’ll quickly run into a problem here, though. Let’s say you have a page at pages/posts/index.js. In local development, you can simply navigate to /posts and see the content of this page. When you export the app, it will generate an HTML page like posts.html. If you upload this build to an S3/CloudFront deployment as described above and navigate to /posts…it won’t work, because the file in S3 is actually called posts.html. If you append the HTML extension yourself in the address bar, you’ll see the page, but this isn’t a great user experience. It’s even worse because links now behave differently. If you have a link on your home page to /posts, when you click that link, the page will load correctly and the address bar will simply show /posts. If you then reload the page at that URL, it will break!
One solution is to create an Edge Lambda function that will append “.html” to the end of each path. You can link the Lambda function to the CloudFront distribution so it runs on every request. The function, written in TypeScript, would look something like this:
// see https://aws.amazon.com/blogs/compute/implementing-default-directory-indexes-in-amazon-s3-backed-amazon-cloudfront-origins-using-lambdaedge/

import * as path from 'path';
import { CloudFrontRequestHandler } from 'aws-lambda';

export const lambdaHandler: CloudFrontRequestHandler = (
  event,
  _context,
  callback
) => {
  const req = event.Records[0].cf.request;
  const oldURI = req.uri;

  // replace trailing slash and, if there's no extension (e.g. .js),
  // add .html, because Next.js exports static HTML files with .html
  let newURI = oldURI.replace(/\/$/, '');
  if (!path.extname(newURI)) {
    newURI += '.html';
  }
  req.uri = newURI;

  // Return to CloudFront
  return callback(null, req);
};
The function strips off any trailing slashes from the incoming request path, and if there is not yet an extension, it appends “.html” and returns the content it finds at that path. If you visit /posts, that’s what you’ll see in the address bar, but you’ll receive the content stored at /posts.html in the S3 bucket.
To link the Lambda function to the CloudFront distribution, you’ll have to create it in the us-east-1 region. Then, in the actions menu, you should have an option to “Deploy to Lambda@Edge.” Once it’s deployed, you can go back to your CloudFront distribution, go to the Behaviors tab, and edit the default behavior for your S3 origin. There is a section for “Lambda Function Associations” where you can set the following options:
- CloudFront Event: origin request
- Lambda Function ARN: the ARN of the function you just created
Your distribution will take a few minutes to update. After it does, your function will run on each request to transform the incoming paths.
Also note that with a Next.js app, you can remove your custom 404 error response, because the routes are actually URLs to different static HTML pages instead of being handled by JS.